Setting Up EverFlow to Integrate with Legal CRM for Affiliate Partner Tracking Follow

Setting Up EverFlow to Integrate with Legal CRM for Affiliate Partner Tracking
Legal CRM proudly supports our integration with EverFlow (spoken as "Ever Flow") affiliate tracking software. This tutorial will also help familiarize you with how to set up and maintain the integration for your firm’s workflow. The EverFlow > Legal CRM Integration is 1-way and it will create new leads/intakes in Legal CRM from any landing pages that have EverFlow traffic and send the correct EverFlow parameters into Legal CRM when a lead conversion occurs.
At the time that a new lead is posted to Legal CRM, the EverFlow “Transaction ID” must be passed from EverFlow into Legal CRM’s “SubID1” API field. When any EverFlow leads reach a pre-configured “EverFlow Event Trigger Status” example “Signed Retainer Contract” then this will tell Legal CRM to send this conversion back to the EverFlow API. You must have an Offer ID for each EverFlow conversion for each Case Type for this to function as it should, which is part of the setup steps in this tutorial.
What is EverFlow? Choose a Smarter Partner Marketing Platform | Track, Manage, Understand Affiliates, Influencers, Apps | Deliver Results and Analysis from Every Kind of Partner Relationship. Aside from Legal CRM, all other trademarks, trade names, screenshots or company names referenced herein are used for identification purposes only and are the property of their respective owners.
Please note: If you do require assistance with EverFlow or need to know your EverFlow Network ID, Offer IDs, or anything else specific to EverFlow, then contact EverFlow support since Legal CRM Support cannot provide support for any products other than Legal CRM.
Table of Contents
Setting Up Legal CRM to Connect to the EverFlow API Integration for Your System
How to Post Your New Leads to Legal CRM with the EverFlow Transaction ID and other Subids
Running Marketing Reports to Include Your EverFlow Conversions
How to Stop Legal CRM from Posting Conversions to EverFlow
Setting Up Legal CRM to Connect to the EverFlow API Integration for Your System
Let’s get started. To get started, on the blue left-menu bar, you will click the “Setup” icon > Select the “3rd Party Integrations” menu option. You must be a user with admin access, or you will not be able to see these menu options. Please ask your firm administrator or IT department if you need these changes made.
Now, you should be in the “3rd Party Integrations” screen.
EverFlow Activation Settings Screenshot: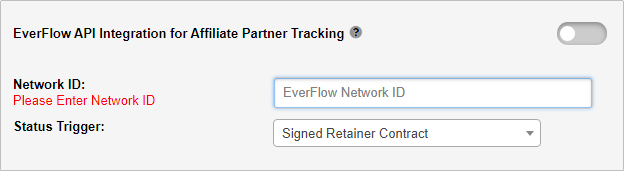
- Add your company’s EverFlow Network ID number in the EverFlow “Network ID” field
- Next, Toggle the On/Off Switch to the “On” position
- This will not allow you to activate it without first entering your Network ID
- Select a Legal CRM "Status Trigger” in the dropdown field. We suggest the status of “Signed Retainer Contract” to designate a successful conversion.
- This screen autosaves, so when finished, you will proceed to the next step.
How to Post Your New Leads to Legal CRM with the EverFlow Transaction ID and other Subids
Now that the EverFlow set up is completed inside of Legal CRM, you will need to connect all of your websites and landing pages to send the “EverFlow Transaction ID” to Legal CRM for each new lead posted to Legal CRM.
⚠️ Any landing pages/websites that do not post the “EverFlow Transaction ID” to Legal CRM will not send to EverFlow
Using InstaPage as an example, you will want to add the “Hidden Form Fields” for “EverFlow” tracking. This is necessary because although you may have live session data on your landing page for each new visitor, that data has no way of integrating with your Legal CRM system without completing this step. This step tells the “InstaPage Landing Page” to send the “EverFlow” tracking data to Legal CRM.
From inside of the Instapage landing page form editor, double-click in the empty space outside of any field in the webform to have the “+ ADD FIELD” This can be a bit picky so make sure you do not click on any existing fields or it will open the settings for that field and not prompt you to create a new form field.
Click “+ ADD FIELD”
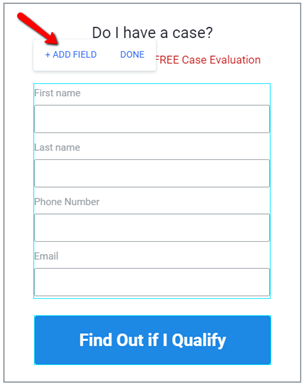
Select “Hidden” for the field type.

Enter a “Hidden field name” based on the listed parameters below. The order of the parameters does not matter.
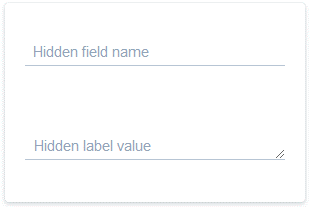
In InstaPage “Hidden Form Fields” you will need to add both a Placeholder and a Value to pass the EverFlow cookie session data to the web form submission:
- Add the “Hidden field name” for each parameter. Example: Subid1
- Add the “Hidden label value” for each parameter with the field name in square brackets:
Example: [Subid1]
Example of a completed “Hidden Form Field” that is correctly set up for EverFlow:

Add "Subid1" for the Field Name
Add "[Subid1]" for the Field Value
The available API Parameters are as follows:
⚠️ Please note: Legal CRM API is case sensitive so it is recommended that you and copy and paste these values. Do not include any quotation marks “ ” in your parameters.
-
“Subid1” – This is the EverFlow Subid1 – this is required. This is the “EverFlow Transaction ID”
- Example use: Subid = 42a44bc123de5f6789g01hi2345j678k
-
“Subid2” – This is the EverFlow Subid2 – this is optional and may or may not apply to your EverFlow implementation. This could be any additional data that you want to send such as the Publisher ID sending traffic
- “Subid3” – This is the EverFlow Subid3 – this is optional and may or may not apply to your EverFlow implementation. This could be used to identify the campaign or CPM# or anything else of your choosing.
*** Add all “Hidden Form Field” parameters that you will need to each “InstaPage Landing Page” that you would like to connect to Legal CRM for EverFlow. Remember, only “Subid1” and "[Subid1]" is required for EverFlow since that is the “EverFlow Transaction ID”
Running Marketing Reports to Include Your EverFlow Conversions
The Legal CRM Custom Reports feature allows any field in Legal CRM to be added to a Custom Report. You will now be able to add the EverFlow fields to any marketing reports so that this data can be included. To do this, you will want to edit an existing custom report and add the following fields to your Custom Report Layout:
- EverFlow Subid1 – this is required. This is the “EverFlow Transaction ID”
- EverFlow Subid2 – this is optional and may or may not apply to your EverFlow implementation. This could be any additional data that you want to send such as Publisher ID sending traffic, or something else.
- EverFlow Subid3 – this is optional and may or may not apply to your EverFlow implementation. This could be used to identify the campaign or CPM#
Screenshot showing the EverFlow fields in Custom Reports as available options: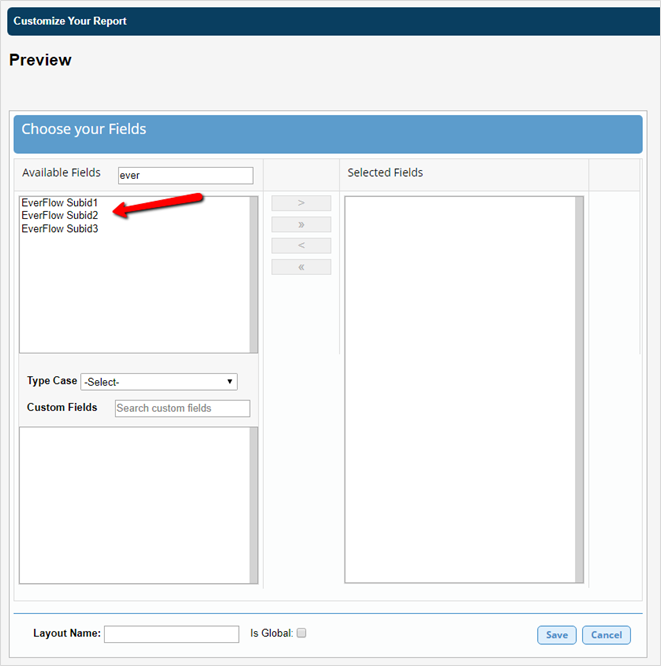
How to Stop Legal CRM from Posting Conversions to EverFlow
⏹️ If you would like to stop all conversions from posting to EverFlow, or a specific company/tracking number pool, then just turn off the EverFlow API Integration inside the “3rd Party Integrations” screen.
Support/Assistance
If you need further assistance on Legal CRM, then please contact Legal CRM Support to assist you further. For further assistance with EverFlow or to get your EverFlow Network ID, Offer IDs, or anything else related to EverFlow, please contact EverFlow support.
🤗 Thank you very much for choosing Legal CRM!