Using the CRM Contingency Settlement Wizard Follow

This feature only applies to Law Ruler CRM Clients using Law Ruler Cases.
The Contingency Billing Tutorial will help familiarize you with how to process a contingency settlement in Law Ruler. Contingency billing for personal injury, mass tort, and other contingency cases is available.
During the life of the case, we recommend adding all case expenses, medical bills, and liens as they become available, so it is easier to preview the settlement along the way and to disburse the settlement when the settlement payment arrives.
When your settlement check arrives, you are ready to deposit the check into the trust and calculate attorney fee(s) without having to catch up on the data entry of expenses. This tutorial will also help familiarize you with how to create and disburse contingency settlements in Law Ruler.
If your firm does not use contingency billing, then you may skip this tutorial.
Video Tutorial:

Leverage our contingency settlement wizard to gain the upper hand in negotiations and maximize your client’s payouts.
- Automated attorney fee calculations for 1 or more firms on each settlement
- Complete expense management to add, edit, and negotiate expenses on the fly to maximize your firm's recovery on each settlement
- Track vendor balances for prepaid expenses in settlements
- Real-time calculation of client amounts due in settlements
- Customizable closing statements that use Law Ruler e-Sign
- Integration with QuickBooks Online when a settlement is processed
The Contingency Settlement workflow can be as simple or complex as your firm would like it to be and is customizable depending on the financial controls at your firm. The complexity will be determined by whether you enable the vendor approval process in Law Ruler. The simplest implementation is to have everything on auto-approve.
For any support needs regarding QuickBooks Online, please contact Intuit QuickBooks Online support directly since Law Ruler may assist with the integration process but they cannot support the QuickBooks Online service.
Table of Contents
Overview of the Contingency Billing Workflow in Law Ruler
Activating the Contingency Billing Workflow
Setting Your Firm’s Default Attorney Fee Percent for Contingency Cases
Your Firm, Other Firms and Fee Splits
Settlement Distribution and Write Check To
Handling of Expenses in the Contingency Billing Workflow
Adding a New Case Cost Expense
Adding Hard Cost Expenses that are Due to a Third-Party Vendor
Tracking Payables and Updating Vendor Balances for Each Hard Cost Expense
Adding Soft Cost Expenses that are Due to Your Firm
Depositing a Settlement Payment
Using the Easy-to-Use Settlement Wizard
How to Process a Partial Settlement
Using the Hovering Toolbar & Saving Your First Settlement
Financial Controls – The Settlement Approval Process
Fully Customizable Closing Statements in the Settlement Wizard
Using E-Sign in the Settlement Wizard
Processing a Settlement in the Settlement Wizard
Overview of the Contingency Billing Workflow in Law Ruler
The Law Ruler contingency billing workflow has a recommended process for best practices use:
- Make sure that the “Billing Type” is set to “Contingency” in the case
- Add/Verify the Settlement Payees (this determines who is paid from each Settlement)
- Add/Verify the Firms and Fee Splits for the Settlement (this is used to calculated Attorney Fees)
- Add the Case Cost Expenses to each Case (these are the costs to be deducted from each Settlement)
- Mark any Prepaid Case Cost Expenses as Paid
- Contact each Vendor or Provider for Final Vendor Balances
- Add any Vendor Adjustments inside of each Case Cost Expense in the Vendor Payable tab
*** At this time, you should be ready to deposit the Settlement Payment(s) *** - Deposit the Settlement Payment(s) into the case trust account for each Settlement
- Press “New Settlement” in the shortcuts bar or in the Settlements Tab
- Edit the Draft Settlement as needed and press “Save” to create draft Closing Statements
- In the Settlement Wizard, review the “Client Amount Due” and adjust the Case Cost Expenses and Attorney Fees until you are satisfied with the Settlement Amount for each client
- Approve the Settlement or send it to the approval user(s) at your firm for approval
- Send the Closing Statement(s) to each client to be e-signed, or you may mark it signed manually
- Process the Settlement to create the Bank Transactions
- If the QuickBooks Online integration is activated, then it will sync Deposits, Invoices, and Payables to QBO when the settlement is processed
Activating the Contingency Billing Workflow
Now, we will go through a more detailed tutorial of the above steps and walk through a real settlement example. To get started with the contingency billing workflow, you will need to enable settlement payments from your firm's client trust account. To do this, you will need an administrative user to go to the “Setup” > “Billing Settings” screen and turn on trust payments by clicking the On/Off switch to "On" for "Use the Trust Account Balance for Each Client to Pay Invoices/Settlements"
Press the blue "Save" button in the top right corner of the “Billing Settings” screen.
⚠️ If you do not enable this, then the "Process Settlement" button will not appear at the end of each settlement and you will not be able to disburse any settlements.
Next, you will want to set the “Billing Type” of the case to “Contingency” to be able to see the “Settlements” tab screen inside of the case/matter.
If the majority of all your firm’s cases are contingency billing, then we recommend that you set the default case “Billing Type” to “Contingency” in the “Setup” > “Billing Settings” screen as shown below. Then, press “Save” in “Billing Settings” in the top-right corner to save the changes. Accessing the “Setup” screen requires admin-level access.
Inside each case in the Finance tab, you can manually adjust the “Billing Type” at any time. It is ok if you need to change it on the fly. The main use of “Billing Type” is to simplify the workflow and show you relevant information and automated selections in dropdowns to improve the user experience.
Setting Your Firm’s Default Attorney Fee Percent for Contingency Cases
Setting the “Attorney Fee Percent” is an important part of contingency cases. The “Attorney Fee Percent” will appear if the “Billing Type” is set to “Contingency” in a case otherwise it is not shown in the system.
You can manually adjust the “Attorney Fee Percent” at any time, in any case by editing it. To keep things simple and easy, Law Ruler allows you to set a default “Attorney Fee Percent” in the “Setup” > “Billing Settings” screen. The default “Attorney Fee Percent” with your new Law Ruler system is automatically to 33 1/3%. If you need to adjust this, then please edit it in “Billing Settings” and then press the blue “Save” button in the top-right corner of the screen.
Your Firm, Other Firms and Fee Splits
Contingency cases could potentially have one or more firms sharing the “Attorney Fee Percent” Keeping track of it all can be a challenging task especially if the case takes a long time to settle. Law Ruler has a feature that makes tracking firm fee splits a simple and very manageable task.
By default, each new case that is created in Law Ruler will automatically add your firm, known in the system as “Our Firm” as the 100.00% “Firm Fee Share Percent” This will pave the way for good settlement accounting and will allow the Law Ruler system to always ensure the total of all Firms and Fee Splits is equal to 100.00% with the auto-adjustment feature.
The “Firms and Fee Splits” grid is located in the “Finance” section inside of a case. Please scroll down to see the “Firms and Fee Splits” grid.
Each new case starts with your firm as the handling firm unless you refer it out or add more firms to the case. If you add one or more additional firms to the case, then your firm’s “Firm Fee Share Percent” will reduce automatically so the total of all firms will always equal 100.00%. If the “Firm Fee Share Percent” does not equal 100.00% and the algorithm cannot make the adjustment for you, then the system will issue a warning for you to adjust it to a total of 100.00% manually.
If you would like to refer a case out, then select the firm from the “Refer a Case” box to the right, and then click the “Ship It” button. The “Firm Fee Share Percent” will automatically add to the “Firms and Fee Splits” grid and your firm’s “Firm Fee Share Percent” will be reduced to accommodate the new firm that was added.
Please note that you will want to make sure that you have a default “Firm Fee Share Percent” set for each referral firm in the “Manage Referral Firms” screen. If you need to edit the list of firms and “Firm Fee Share Percent” for each, then please click on “Setup” > “Manage Referral Firms” to modify those settings, otherwise the new firm may be added as 0.00% if no value was set up in the firm record.
Settlement Distribution and Write Check To
Law Ruler has a “Settlement Distribution” grid that is located below the “Finance” section. This feature is used for managing the payee(s) that are to be paid out during settlement of the case and the “Write Check To” recipient on any settlement checks. If the client is a deceased party, then you will want to add special instructions for who is to be paid at settlement in the “Settlement Distribution” grid. There are a variety of ways that this can be done so follow your own firm’s protocol.
By default, the injured party client is automatically added as the 100.00% settlement distribution payee when a new case is created. There is an algorithm that will ensure that the total of all payees will always equal 100.00%.
Also, the injured party client’s name is automatically added as the “Write Check To” recipient for all new cases.
If the payee’s name differs from the client’s name on the case, you will click on the green “Edit” icon in the “Settlement Distribution” grid. If you need to change it, then add in a different “Write Check To” name and press “Save”
If you have multiple payees on a case and want to include that in the remittance statement, then you will want to add them by pressing the “Add Payee” button in the “Settlement Distribution” grid.
If there is a legal representative or probate attorney who needs to administer the settlement payment, you will want to select “No” in the “Does this Payee get paid directly” dropdown field, and then you will need to select the contact for the “Legal Representative” that will be administering the payment. Press “Save” to save the changes.
Handling of Expenses in the Contingency Billing Workflow
After evaluating the different scenarios involving firms and billing type, attorney fee percent fee splits, and settlement distribution, we are ready to proceed.
As each contingency case progresses, your firm will incur various case costs expenses. Some expenses such as court filing fees and medical record retrieval costs will need to be prepaid immediately while other expenses such as client medical bills or pre-settlement loans will not be paid until settlement, if at all. How do you manage it all? 💭
Law Ruler has special handling for expenses such as client medical bills that are not paid until settlement time, if at all. In Law Ruler, these special expenses are named “Settlement Expenses” and are marked as “Hold for Settlement”
All hard and soft cost expenses other than “Settlement Expenses” will be paid out and handled as they arrive, as needed by the firm. Some of these expenses will be soft cost expenses that the firm prepays out of the operating account or petty cash such as parking, mileage, or an administrative fee to process the case, etc. Generally, most firms will recover most if not all prepaid soft cost expenses at the time of settlement. Or, they could be hard cost expenses due to a third-party vendor or lienholder such as court fees, client medical bills, transcription costs, travel tickets, etc.
Best practices dictate that all case expenses and vendor balances should be updated during the life of the case and not wait for the very end, but each firm may have its own process for tracking expenses. Law Ruler’s contingency billing workflow is flexible and will work with either approach; entering all expenses during the case or entering the settlement expenses at settlement time.
Please bear in mind that Law Ruler’s contingency workflow includes a “Settlement Calculator” feature that will not be accurate to provide a snapshot of what settlement will look like if you wait until settlement time to add your expenses. For the firms that choose to enter expenses during the life of the case, the “Settlement Calculator” will allow you to accurately evaluate any offers as they are presented.
During a settlement, there may be certain expenses that are either partially or completely held back by a firm. Based on how the system was designed, the expenses do not become billed until they are invoiced or placed in a settlement and that settlement is approved. When an expense is held back from a settlement or invoice, the "Not Billed Yet" amount will be automatically updated. This would be the amount of the expense that has not been billed yet. This is designed this way so that a firm can hold back certain expenses from a settlement but keep an accurate tab of what they need to write off or which expenses are outstanding in the future if there is another opportunity to recover them. Some firms track unbilled expenses if clients have multiple settlements with them since they may have the opportunity to recover the unbilled expenses later from the client.
Adding a New Case Cost Expense
The Law Ruler Expense and Costing feature does it all and can handle anything including adding in third-party vendors, hard cost expenses, soft cost expenses due to your firm, or settlement expenses to be held and deducted at the time of settlement.
When adding your first expense you will need to decide what “Cost Type” to choose for the new expense.
Law Ruler supports these “Cost Types” for various scenarios with complete flexibility:
- “Hard Cost – Third-Party Vendor” is an expense due to a third-party vendor that was paid as part of a case. Examples: experts, client medical bills, travel tickets, court filing fees, etc.
- In the QuickBooks Online sync, this Cost Type will sync upon creation.
- In the QuickBooks Online sync, this Cost Type will sync upon creation.
- “Soft Cost – Due to Our Firm” is an expense that is due to your or another firm that you want to be reimbursed by the client. Examples: mileage, photocopies, paper, firm administrative fees, etc.
- In the QuickBooks Online sync, this Cost Type will not sync until it is added to an invoice.
- In the QuickBooks Online sync, this Cost Type will not sync until it is added to an invoice.
- “Settlement Costs” are an optional, subclassification of hard costs that will normally include soft costs, special damages, client debts, or medical bills that the client is responsible to pay that may be deducted from a settlement by your law firm.
- Settlement Costs will not sync to QuickBooks Online until after a settlement is processed
Normally, your firm will enter settlement expenses at the time of settlement or ad hoc, depending on your firm protocols. Either way, settlement expenses are to be paid to a third-party vendor on behalf of a client. These need special handling during a settlement so they do not get considered as expenses until after the settlement is processed. This is to prevent potential tax liabilities for debts that belong to the client, not the firm. Settlement expenses will not create vendor bills in the QuickBooks Online integration until a settlement reaches final approval or you invoice them manually.
These are the available cost types for settlement expenses in Law Ruler:
- "Soft Cost - Hold for Settlement" is an expense that the firm will recover at the time of settlement when it is paid out, and not before. If you want to invoice a customer for a soft cost immediately before a settlement is paid out, then do not use this Cost Type.
- This Cost Type will not sync to QuickBooks Online until after a settlement is processed.
- This Cost Type will not sync to QuickBooks Online until after a settlement is processed.
- “Special Damage – Hold for Settlement” is an expense owed by the client such as a hospital bill. We recommend the Expense Category of "Client Medical Bills" for client meds. Choosing this category will make the Service Type and Service Date fields appear.
- This Cost Type will not sync to QuickBooks Online until after a settlement is processed.
- This Cost Type will not sync to QuickBooks Online until after a settlement is processed.
- “Settlement Loan – Hold for Settlement” is a loan expense owed by the client to a finance company, for example, a pre-settlement loan
- This Cost Type will not sync to QuickBooks Online until after a settlement is processed.
- This Cost Type will not sync to QuickBooks Online until after a settlement is processed.
- “Other Client Debt – Hold for Settlement” is a client expense/debt such as an insurance payment or burial expenses, or anything else that you need to pay on behalf of a client that would not be a special damage or settlement loan.
- This Cost Type will not sync to QuickBooks Online until after a settlement is processed.
Adding Hard Cost Expenses that are Due to a Third-Party Vendor
Hard costs are expenses that are due to third-party vendors that are paid as part of a case. Entering a hard cost expense that is a settlement expense will be a similar process, except the “Cost Type” will be different depending on if it is a settlement expense to be paid later at settlement or a hard cost that is being paid now. It is important to select the correct Cost Type or you could prematurely sync expenses before a settlement is processed if you use the QuickBooks Online sync.
- Examples: experts, travel tickets, court filing fees, etc.
Usually, most hard costs are billable to the case/client since they are incurred by the firm as part of a case. You decide if a hard cost will be client billable or not by using the client billable selector button to switch to “On” or “Off”
To add a “Hard Cost” you will go into a case, then press the “Expenses” tab button in the top menu bar, then press “Add Expense” in the top-right of the Expenses screen. Then, you will pick the “Cost Type” of “Hard Cost – Third-Party Vendor” Hard Costs require a Vendor to be selected since they are expenses that are paid to a third-party vendor.
Next, we will decide if there is a “Lien/Hold” or not for this expense. If there is a Lien or Hold, then set the “Lien/Hold” selector button to “On” or “Off” depending on your needs. If you add a Lien or Hold to an expense, then you need to select the “Lien/Hold Type” The “Lien/Hold Type” dropdown will not appear until you select “On” for the “Lien/Hold” selector.
Generally, Liens and Holds are used for Settlement Expenses and will be considered during a settlement, but they may be needed for hard costs, so we make them available in hard costs for your firm.
After deciding if there is a Lien/Hold or not, you will select the “Vendor” for the expense.
If you do not see the Vendor that this expense is related to, then the Vendor will need to be added. You may add a vendor at any time by going to the “Vendors” screen or by selecting “New Vendor” inside of an expense if you have admin or accounting user permissions. If you do not have admin or accounting user permissions, then you will not see the “Add Vendor” or “Edit” Vendor buttons when adding, editing, or viewing an expense.
The “Date Issued” will automatically insert the current date but it is editable if you are post-dating an expense that the firm has already incurred.
The “Invoice #” is the vendor invoice number and is an optional field.
The “Amount Billed” is the unit cost of the expense. This field is required.
“Qty” is the quantity of the expense. This is the number of units of the expense. This field is required but defaults to “1”
“Total” is the total of the expense and is a non-editable, calculated field. This is calculated as (Amount Billed * Qty)
“Category” is the billing category for this expense. Law Ruler comes preloaded with UTMBS and LEDES billing codes.
“Billable to Client?” is the button switch to determine if this expense is billable to the client or not. The default option is “On” for your convenience since most hard costs are billable back to the client or case. If you do not want to bill your client for this expense, then you would select “Off” for this option.
“Description” is the line item description for this expense. Feel free to add any information or details here. This field is visible in the expenses screen and in all expense reports.
“Document Upload” is an upload widget that will allow you to attach one or more receipts, vendor invoices, or other expense documentation that you may need to upload. Any expense document uploads will be viewable from the expense or from the Documents tab inside of a case.
Please note, if you select the Expense Category of “Medical Bills” then the system will automatically open and display the “Service Type” and “Service Date From/To” fields. If you need to pay out this expense right away and are not waiting for a settlement, then you are welcome to add it as a Hard Cost expense at any time.
“Service Type” is the type of service that relates to the medical bill.
“Service Date From/To” are the dates of service and it is recommended that you add them if you know them.
⏭️ After you have made your selections in the “Add Expense” screen, you will press the “Create Expense” button to continue.
Tracking Vendor Payables and Updating Vendor Balances for Each Hard Cost Expense
Each expense has two parts, what the customer owes, and what your firm owes to a vendor or to the firm for recoverable expenses. Law Ruler lets you track both and also pairs this data with QuickBooks Online.
- “Accounts Receivable (A/R)” is the amount owed by a customer to your firm. For A/R, the Amount Billed is what you invoice each customer for each expense, also known as the Customer Balance.
The “Customer Balance” of each expense can only be updated with Bank Transactions by paying, crediting or adjusting Customer Invoices or with LawPay. Only Bank Transactions will affect A/R. Vendor Transactions do not affect the "Customer Balance" of an expense. - “Accounts Payable (A/P)” is the amount owed by your firm to a Third-Party Vendor or back to the firm for a recoverable soft cost expense from a settlement. The “Vendor Balance” is the current balance owed to a Vendor or to be recovered by the firm for each payable. Only Vendor Transactions will affect the “Vendor Balance”
- For example, if you recover expenses during contingency settlements, then you should add Vendor Transactions to always have the proper Vendor Balances for any expenses that you prepay during a case. The Vendor Balance for each expense is what the Settlement Wizard will pay out to each Vendor or Firm during settlements.
- If you have the QuickBooks Online Sync active, then as each expense is added in Law Ruler, it will create a Vendor and Vendor Payable in QuickBooks Online, which is referred to as a "Vendor Bill” in QBO. Law Rules tracks "Vendor Balances" but does not create "Vendor Bills” in the same way as QuickBooks Online.
🔎 To add a Vendor Transaction such as a payment, adjustment, credit, or deposits, or to view the “Vendor Balance” for any expense, you will click on any expense to drill down inside of a case.
- For example, if you recover expenses during contingency settlements, then you should add Vendor Transactions to always have the proper Vendor Balances for any expenses that you prepay during a case. The Vendor Balance for each expense is what the Settlement Wizard will pay out to each Vendor or Firm during settlements.
Inside of Law Ruler, “Vendor Balance” amounts are only visible in Cases, not leads/intakes, as shown below since cases are considered to be actual financial accounts:
Here is a closer view:
If you add any Vendor Transactions on a "Vendor Payable" in Law Ruler, then those transactions will sync with QBO and update the balance for the related “Vendor Bill” in QuickBooks Online.
Any transactions on any "Vendor Payables" will also update the “Vendor Balance” for the related Vendor in QBO. In QuickBooks Online, the “Vendor Balance” is the total amount that your firm owes to each Vendor at any given time.
Adding Soft Cost Expenses that are Due to Your Firm
Soft costs, also known as reimbursable costs, are expenses that are prepaid during a case that will be due to your or another firm and are able to be recovered during settlement disbursement.
- Examples: mileage, photocopies, paper, firm administrative fees, etc.
Usually, most soft costs are billable to the case/client since they are incurred by the firm as part of a case. You decide if a soft cost will be client billable or not by using the client billable selector button to switch to “On” or “Off”
To add a “Soft Cost” you will go into a case, then press the “Expenses” tab button in the top menu bar, then press “Add Expense” in the top-right of the Expenses screen. Then, you will pick the “Cost Type” of “Soft Cost – Due to Our Firm” Soft Costs do not require a Vendor to be selected since they are expenses that are due to your firm. The Vendor dropdown will be invisible and not displayed if you are adding a “Soft Cost” expense. If a Soft Cost is due to another firm, then select the other firm in the "Firm" dropdown.
Also, soft costs do not allow Liens/Holds so the “Liens/Holds” field will not be displayed. If you need to put a lien on an expense, then use one of the "Hard Cost' types.
The “Date Issued” will automatically insert the current date but it is editable if you are post-dating an expense that the firm has already incurred.
The “Invoice #” is the vendor invoice number and is an optional field.
The “Amount Billed” is the unit cost of the expense. This field is required.
“Qty” is the quantity of the expense. This is the number of units of the expense. This field is required but defaults to “1”
“Total” is the total of the expense and is a non-editable, calculated field. This is calculated as (Amount Billed * Qty)
“Category” is the billing category for this expense. Law Ruler comes preloaded with UTMBS and LEDES billing codes.
“Billable to Client?” is the button switch to determine if this expense is billable to the client or not. The default option is “On” for your convenience since most hard costs are billable back to the client or case. If you do not want to bill your client for this expense, then you would select “Off” for this option.
“Description” is the line item description for this expense. Feel free to add any information or details here. This field is visible in the expenses screen and in all expense reports.
“Document Upload” is an upload widget that will allow you to attach one or more receipts, vendor invoices, or other expense documentation that you may need to upload. Any expense document uploads will be viewable from the expense or from the Documents tab inside of a case.
Please note, if you select the Expense Category of “Medical Bills” then the system will display the “Service Type” and “Service Date From/To” fields. Generally, you will want to reserve this functionality for Settlement Expenses, but if you need to pay out this expense right away and are not waiting for a settlement, then you are welcome to add it as a Hard Cost expense at any time.
“Service Type” is the type of service that relates to the medical bill.
“Service Date From/To” are the dates of service and it is recommended that you add them if you know them
After you have made your selections in the “Add Expense” screen, you will press “Create Expense” to continue.
Adding Settlement Expenses
Settlement Expenses are an optional subclassification of hard cost expenses and usually for contingency cases and will normally include special damages, client debts or medical bills that the client is responsible to pay that may be deducted from a settlement by your law firm. Normally, your firm will enter these expenses at the time of settlement or ad hoc, depending on your firm protocols. If you choose to simplify things and just use hard cost expenses, then you may.
Either way, settlement expenses are expenses to be paid to a third-party vendor on behalf of a client. These need special handling during a settlement. Special damages will not create vendor bills until a settlement reaches final approval or you invoice them manually.
As a refresher, these are the available cost types for settlement expenses in Law Ruler:
- "Soft Cost - Hold for Settlement" is an expense that the firm will recover at the time of settlement when it is paid out, and not before. If you want to invoice a customer for a soft cost immediately before a settlement is paid out, then do not use this Cost Type.
- This Cost Type will not sync to QuickBooks Online until after a settlement is processed.
- This Cost Type will not sync to QuickBooks Online until after a settlement is processed.
- “Special Damage – Hold for Settlement” is an expense owed by the client such as a hospital bill. We recommend the Expense Category of "Client Medical Bills" for client meds. Choosing this category will make the Service Type and Service Date fields appear.
- This Cost Type will not sync to QuickBooks Online until after a settlement is processed.
- This Cost Type will not sync to QuickBooks Online until after a settlement is processed.
- “Settlement Loan – Hold for Settlement” is a loan expense owed by the client to a finance company, for example, a pre-settlement loan
- This Cost Type will not sync to QuickBooks Online until after a settlement is processed.
- This Cost Type will not sync to QuickBooks Online until after a settlement is processed.
- “Other Client Debt – Hold for Settlement” is a client expense/debt such as an insurance payment or burial expenses, or anything else that you need to pay on behalf of a client that would not be a special damage or settlement loan.
- This Cost Type will not sync to QuickBooks Online until after a settlement is processed.
This is an example of a completed Settlement Expenses for demonstration purposes:
Depositing a Settlement Payment
🎉 Hooray! You have a settlement payment to deposit. The first step to depositing a settlement payment is to enter a deposit transaction in the “Bank Transactions” screen. There are a couple of ways to access the “Bank Transactions” screen in a case.
Click on the shortcut button for “+ Create New” then click on the “New Deposit” button. This will open the “Bank Transactions” screen to the “Deposit” type of transaction.
As an alternative, you may also click on the “Bank Transactions” tab in the top menu navbar.
Then, click on “Add Transaction” and select “Deposit” for the “Transaction Type” from the dropdown, as shown below.
The next step is to choose the account that you are depositing the payment into. Settlement payments are client funds, so best practices suggest that you deposit them into the client trust account.
In the “Account” dropdown, select the client trust account. The current balance of each bank account will display for this case. Please note, this is a virtual balance for this case and not the actual balance of the account at your financial institution since it only displays the account balance as it relates to this one case.
Then, in the “Paid By” field, you will choose the contact that paid the settlement from one of the contacts that are already added to his case.
⚠️ Don’t see the payor in the “Paid By” dropdown? Please note that you may only select from contacts that are already added to the case so if you do not see the person or company that made this payment, then you need to go back to the Case Details screen and press “Add Contact” then select a “Case Role” for them, and then add them to the case. Then, come back to make a deposit and you will see them in the “Paid By” dropdown field.
Next, for the “Payment Method” select the payment method from the dropdown field. If it is a check, wire transfer, or ACH/EFT, then it is recommended to enter the check number or confirmation number below.
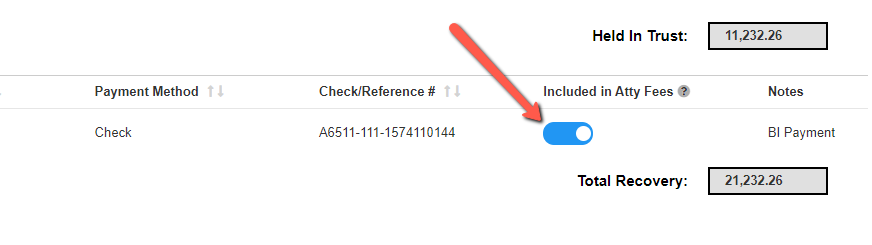
Sometimes, you will have deposits that should not have attorney fees taken from them when they are added to a settlement. A common example of this is MedPay deposits. If you need to exclude a deposit from having attorney fees taken from it, make sure to turn on the setting for "Exclude from Attorney Fees". Please note, you can also determine to exclude a deposit from attorney fees while inside the settlement wizard by using the "Included in Atty Fees" setting:
Add any “Notes” if you would like or memos or anything else that you would like in this field.
Press “Save” to save your deposit to the ledger.
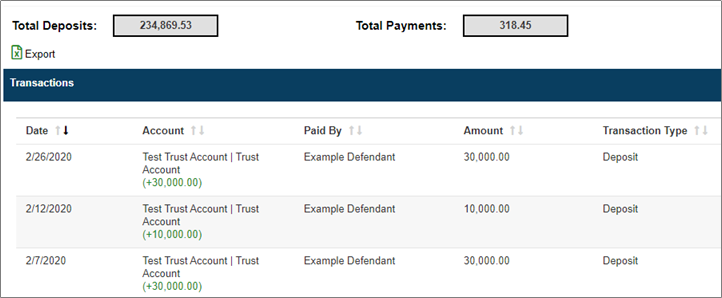
After the deposit transaction is completed, you will see a “Successfully created” message in the bottom-right corner of your screen and the deposit will be shown in the “Bank Transactions” grid per the below screenshot example. Any deposits will show in the “Financial Details” section and update the virtual trust and/or operating account balances for each specific case.
Attorney Fees in Settlements
Now that the settlement payment is deposited, it is time for your firm to get paid your attorney fees. Law Ruler comes with an “Attorney Fee” calculation tool in the Settlement Wizard. This will automatically calculate any fees for any firm(s) involved in each case/matter based on the “Attorney Fee %” and the “Firm Fee Share %” for each firm in each case.
In this example, the “Attorney Fee %” is set to 30.00%. Law Ruler also accepts fractions such as 33 1/3, 66 2/3, etc
In this example, there is a 70,000.00 deposit in this settlement:
The “Attorney Fee” is auto-calculated for 1 or more firms involved in each settlement (only 1 firm in this example).
(30.00% of 70,000.00 = 21,000.00)

Using the Easy-to-Use Settlement Wizard
After you press the “Create and View” button, you are magically transported 🔮 to Law Ruler’s
“Easy-to-Use Settlement Wizard” You are going to love it ❤️
You will have most of the flexibility of Excel, with all the power of our cloud.
Of note, all settlements have their own “Settlement Status” which is to indicate the status of each settlement and is separate from the “Lead/Intake Status” or “Case Status” used throughout the system. All settlements will start in “Draft” mode in Law Ruler to allow your firm the ultimate ease of use and flexibility. When you first enter the “Settlement Wizard” you will want to familiarize yourself with the “Draft” Settlement Status in the top-right corner. Draft settlements have a yellow background status color.
At the top of the screen, you will see the case name in blue. The blue “Case” link will navigate you back to the case if you need to go back and look at any case details. The case link is for internal purposes only at your firm. It will only display for users inside of the system and will not print on closing statements. It will be invisible to clients and anyone else that is not signed into Law Ruler.
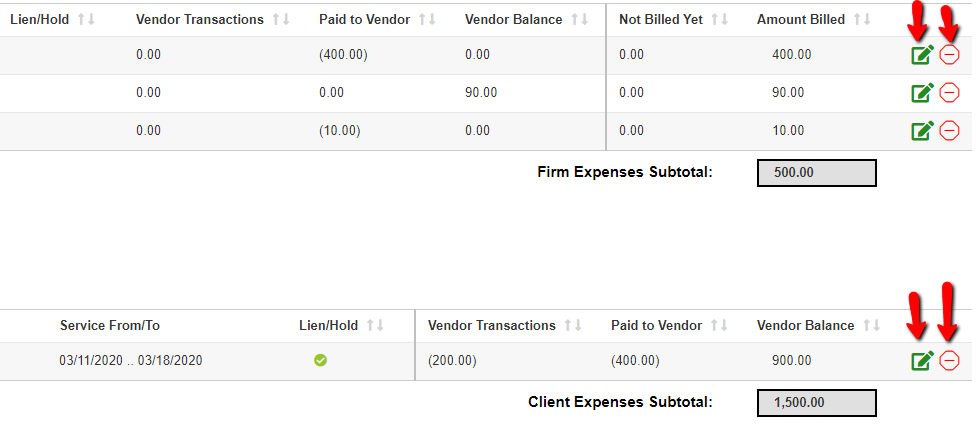
Inside of each Settlement, there will be a grid of Services and Expenses. The "Services" grid is where the attorney fees and fee splits are calculated. The "Expenses" grid is where all of the case costs are calculated. Each of these is editable before a settlement is finalized.
To edit an attorney fee or case cost, click on the green "Edit" icon to the right of each item.
To remove an attorney fee or case cost from a settlement, click on the red "Delete" icon to the right of each item.
Screenshot example of the "Edit" and "Delete" options:
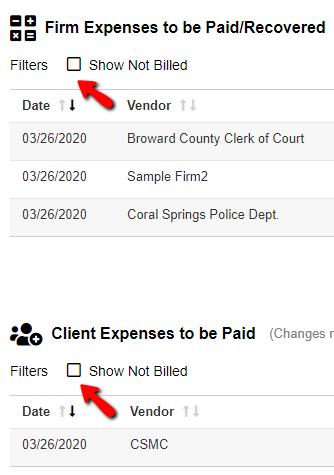
Made a mistake or want to put an expense back on a settlement? If you remove a case cost and want to add it back, then click the "Show Not Billed" filter to show any case costs that were removed.
Then, on the case cost that you want to put back on the settlement, click the blue "+" icon on the right side to add each case cost back onto the settlement.
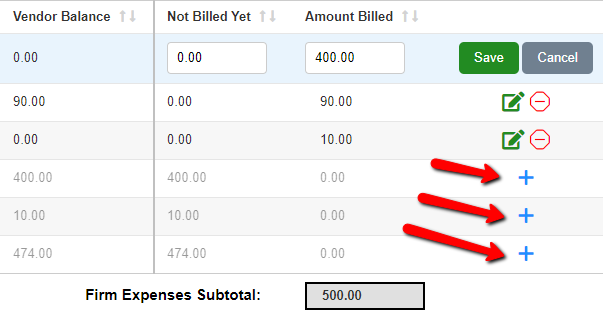
Need to adjust a case cost and only partially bill it to the settlement? Easy. Just click the green “Edit” icon and adjust the “Amount Billed” as needed, and it will auto calculate the “Not Billed Yet” amount that will remain on the case for future use or write-off.

Also, you will be able to see the current “Vendor Balance” and the amount “Paid to Vendor” for each case cost by reviewing that information. Also, any payments to third-party vendors will be calculated based on the current "Vendor Balance" for each payable. For more information on updating the "Vendor Balance" of each payable, please refer to this section: Tracking Payables and Updating Vendor Balances for Each Hard Cost Expense
Now, you should be familiar with how to make any changes to settlements and be ready to proceed at this time.
How to Process a Partial Settlement
Sometimes, you will need the ability to partially disburse a contingency settlement to get money to your client while you are still negotiating some of their remaining expenses. This does occur during the normal course of business in various contingency cases.
To accomplish this, it is recommended that you first remove any expenses you are still negotiating from your settlement, using the red "Delete" icon to the right of each item.
⚡ Don't worry, the "Delete" icon will remove the expense from the settlement but does not really delete it from the case. If you make a mistake or would like to see what expenses are removed, then click on the "Show not billed" filter in the settlement, then press the + button to add any expenses back to the settlement.
After you have removed the expenses that you are still negotiating, you can enter in the amount of money you would like to hold in trust and not disburse as part of the settlement using the Total Remaining - Held in Trust field:
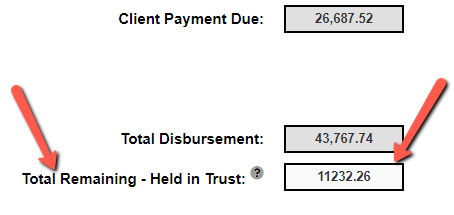
Normally, the amount you hold in the trust account for each settlement will be equivalent to the total amount of the removed expenses that are still being negotiated, but you may decide what amount to hold back in trust.
Once you have finished negotiating the expenses you originally removed from your settlement, you can process one or more settlements until the funds held in trust are fully disbursed.
Please note, any amount you hold back in the trust account will be automatically added to any new settlements that are processed on the same case, after a partial settlement is processed. And, there is flexibility as that any additional settlements could reference new deposits and/or you can process a settlement without any new deposits and the settlement could use the money held in trust only.
Using the Hovering Toolbar & Saving Your First Settlement
At the bottom of the screen is the “Hovering Toolbar” which is a dark gray bar that holds your settlement controls. The “Hovering Toolbar” allows you to Approve, Cancel, E-Sign, Process, Print, Save, and Send the settlement to your client. Please familiarize yourself with the “Hovering Toolbar” since the only way to make your draft settlement into a real settlement is to press “Save” or “Send” in the “Hovering Toolbar”
Various options for sending the settlement to your client such as “Text/Email” a closing statement and “E-Sign” a settlement will be available after you “Save” your settlement the first time. Saving a settlement will convert the draft to a real settlement and change the status to “Open” An “Open” Settlement status will have a green background status color and it indicates that it is a real settlement and no longer a draft. Financial transactions do not occur until a settlement is saved and in the “Open” status.
If you need to cancel a settlement, you will press the red “Cancel” button in the hovering toolbar on the bottom left corner of your screen. If you do cancel a settlement, then the time entries and expenses that were added to the settlement will be reversed to unbilled status and be available to create a new settlement.
To proceed with paying the firm, make your draft settlement into a real settlement is to press “Save” in the “Hovering Toolbar” in the bottom-right corner of the gray bar.
Financial Controls – The Settlement Approval Process
Law Ruler includes financial controls for the approval of settlements that you may use or turn “Off”
In “Setup” > “Billing Settings” you can turn on the Settlement Approval process or leave it in the “Off” position. If you turn “Require Approval for Settlements” to the “On” position, then you are required to select at least 1 user who will be notified when each settlement needs to be approved. This financial control is a good idea for medium to larger firms that have a separate person responsible for verifying each settlement before it may be processed. Smaller, boutique firms will usually leave this in the “Off” position to keep things simple. The choice is yours.
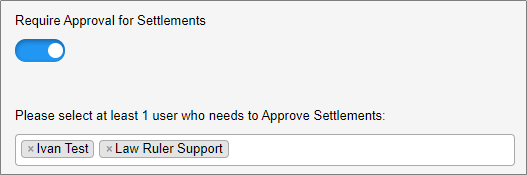
The selected user(s) for settlement approval will receive an email with a link to each settlement. The “Settlement Status” will automatically change to “Approved” as each settlement is approved.
Processing Payment Requests
If you ever need to pay a client and/or an existing vendor from a deposit on file, you will want to process a "Payment Request" To get started processing a payment request, click on the shortcut button in a case by clicking the “+ Create New” button as shown below, then click on the “New Payment Request” button.
This will open the “Bank Transaction” screen to the “Payment Request” type of transaction.
As an alternative, you may also click on the “Bank Transactions” tab in the top menu navbar.
Then, click on “Add Transaction” and select “Payment Request” for the “Transaction Type” from the dropdown, as shown below.
The next step is to enter the amount of your payment request.
Next, in the “Select Deposit” dropdown, select the deposit you would like to make a payment request from. Please note, you can only select one deposit at a time. The current balance of each deposit will be displayed in the dropdown list.
Then, in the “Paid To” field, you will choose the contact that you would like to issue the payment to.
⚠️ Don’t see the payee in the “Paid To” dropdown? Please note that you may only select from contacts that are already added to the case. If you do not see the person or company that you'd like to pay, then you will need to go back to the Case Details screen, press “Add Contact” then select a “Case Role” for them, and then add them to the case. After they are added to the case, then you may come back to make a payment request and you will see them in the “Paid To” dropdown field.
Next, for the “Payment Method” select the payment method from the dropdown field. If it is a check, wire transfer, or ACH/EFT, then it is recommended to enter the check number or confirmation number below. If your firm uses the QuickBooks Online sync, then this will create a payment request in that app.
Add any “Notes” if you would like or memos or anything else that you would like in this field.
Press “Save” to save your payment request to the ledger.
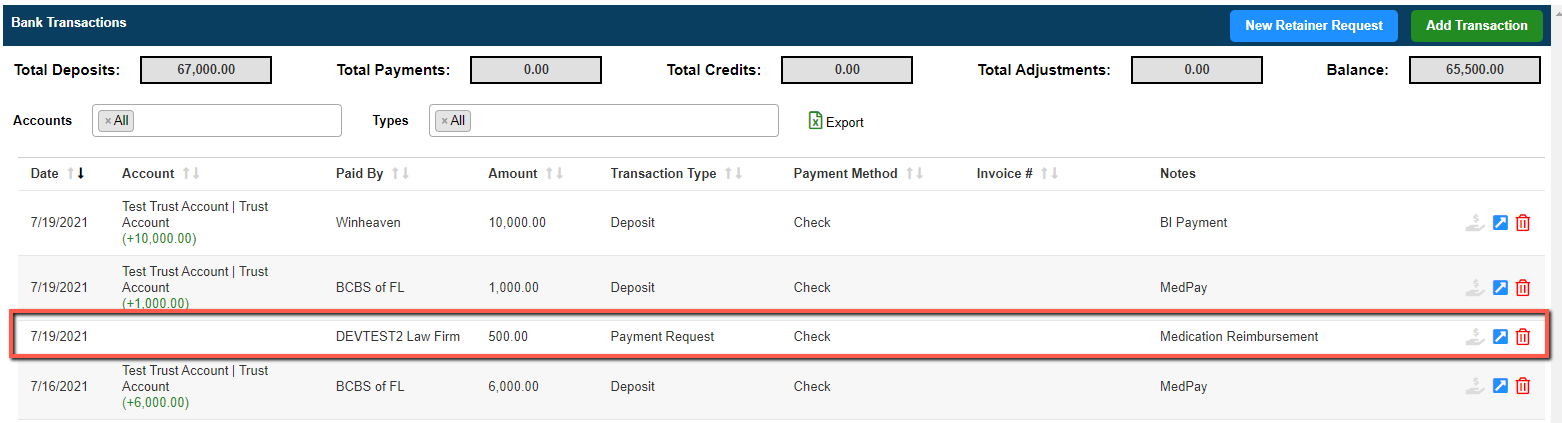
After the payment request transaction is completed, you will see a “Successfully created” message in the bottom-right corner of your screen and the payment request will be shown in the “Bank Transactions” grid per the below screenshot example.
Fully Customizable Closing Statements in the Settlement Wizard
After requesting feedback from many various firms, Law Ruler was advised that most firms each have their own unique closing statement template. In response to this requirement, Law Ruler’s Settlement Wizard includes a completely customizable closing statement template that may be edited in Microsoft Word or Google Docs. If you would like to replace the closing statement template for your system, then please contact Law Ruler Support for assistance.
Each data point in the closing statement template is fully editable and is a mail merge field that will automatically fill in a settlement, vendor, and customer data from the database. For example, if your firm decides that they do not like to include the account balances or settlement transaction ledger on your closing statements, then simply remove those from the closing statement template.
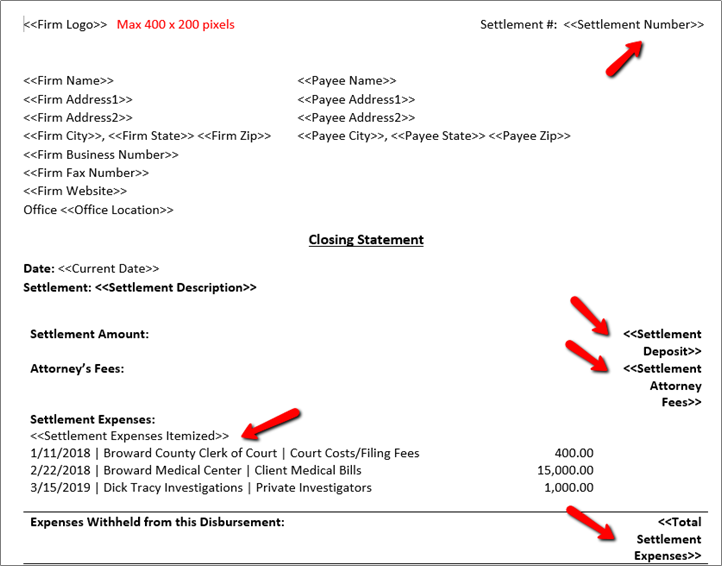
Please review below for a full list of supported mail merge fields for closing statements uploaded to Law Ruler. These are not case sensitive:
-
- <<Payee Name>>
- <<Payee First Name>>
- <<Payee Address1>>
- <<Payee Address2>>
- <<Payee City>>
- <<Payee State>>
- <<Payee Zip>>
- <<Payee Address>>
- <<Settlement Date>>
- <<Settlement Number>>
- <<Settlement Description>>
- <<Settlement Deposit>>
- <<Settlement Attorney Fees>>
- <<Total Settlement Disbursement>>
- <<Settlement Amount Held In Trust>>
- <<Expenses Withheld>>
- <<Total Settlement Expenses>>
- <<Total Settlement Fees And Expenses>>
- <<Total Net Settlement Client Amount>>
- <<Trust Account Balance>>
- <<Operating Account Balance>>
- <<Settlement Link>>
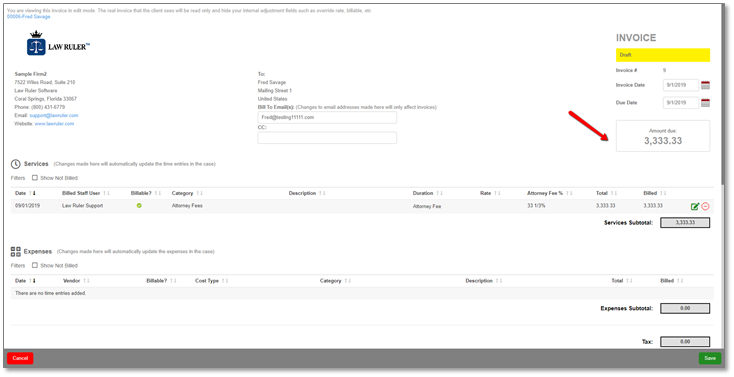
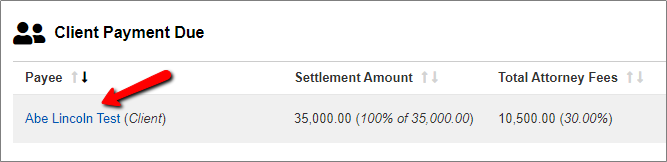
After a settlement is open and no longer in a draft mode, you may view the closing statement for each client. To view a closing statement, click on the blue hyperlinked name of each client in the “Client Amount Due” grid inside of each settlement as shown below:
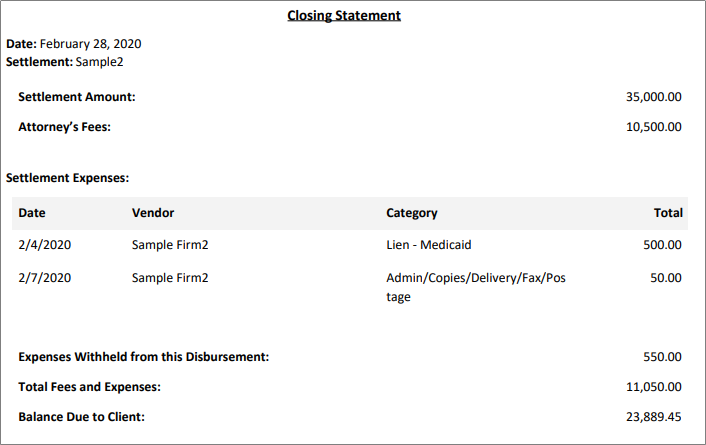
After clicking on the client’s name, the closing statement will download to your system in PDF format so that it may be viewed. Below is an example of you the data fills into the closing statement template from the database for each settlement:
Using E-Sign in the Settlement Wizard
Some of the additional feedback that Law Ruler was told was that many firms would prefer to use e-sign technology as an alternative to face-to-face meetings or sending settlement releases via overnight or 2-day shipping. As a result, Law Ruler built e-sign directly into the settlement wizard to streamline the process for both the clients and firms.
After a settlement has a “Settlement Status” of “Approved” you will be able to see the e-sign and “Process Settlement” options available in the gray hovering toolbar at the bottom of the settlement wizard.

Best practices suggest that most firms should have each client sign a settlement release before disbursing a settlement to each client. This is recommended, but not required.
✍️ E-sign is optional but suggested. If you would like to send a closing statement and your firm’s settlement terms and conditions to a client via e-sign, then press the green “Send E-Sign via Email” or “Send E-Sign via Text” button. Please note that this feature is only available for clients that use HelloSign as the e-sign provider inside of Law Ruler.
After you press the e-sign button, you will see a success badge appear per the screenshot below:

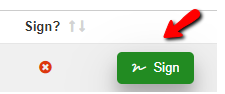
If you do not use e-sign, but you do want to mark a closing statement as signed, then you may click the green “Sign” button on the right side of each client row in the “Client Payment Due” grid:

Processing a Settlement in the Settlement Wizard
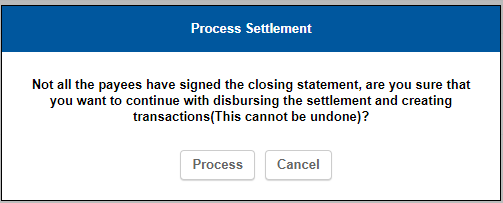
It is time to process the transactions after you have completed the optional signature process. Once you are ready to proceed, you will press the “Process Settlement” button. If you have not signed the closing statement or marked it "Signed" then you will see the following warning message to give you one more opportunity to get your release signed before disbursement:
After you press the “Process” button, you will be sent to the “Process Settlement” screen which will list all the settlement transactions.
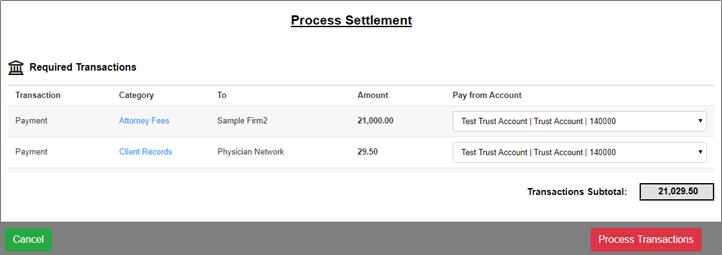
At this time, you will have the option to choose the “Pay from Account” for each transaction which will determine which account to use for payment. The default is the client trust account for all transactions. If you need to pay any settlement transactions out of the operating account, then select it from the available accounts in the “Pay from Account” dropdown.
For client amounts due, these will be created as credit memo transactions, not payments, since technically, the client is being given a credit against the trust account and is not a vendor.
Any attorney fees due to law firms will be created as payment transactions with the law firm as the Vendor.
Also, any payments to third-party vendors will be calculated based on the current "Vendor Balance" for each payable. For more information on updating the "Vendor Balance" of each payable, please refer to this section: Tracking Payables and Updating Vendor Balances for Each Hard Cost Expense
When you are finished and ready to finalize the disbursement, then click the red “Process Transactions” button. At this time, all transactions will be reflected in the ledger in any related case(s) and the settlement will be considered final.
If you are using separate bookkeeping or accounting software and would like to export the transaction ledger at this time, then you will want to return to your case and go to “Bank Transactions” and press the “Export” button to export all of the transactions for each case to Excel CSV format.
You may have your firm’s accountant draft any settlement checks/payments to customers, firms, and vendors at this time based on the payment transactions created from the settlement wizard.
🧾 If you have the QuickBooks Online Sync activated, then any customers, firms, vendors, and transactions will be synced with QuickBooks Online at the same time as they are reflected in the ledger in any related case(s) in Law Ruler. Your firm’s accountant may cut these checks/issue payments directly out of QuickBooks at this time.
👍 Success! Now, you may write a check or pay each payment recipient as needed since the payment request is now recorded in your Law Ruler ledger.
Support/Assistance
If you need further assistance, then please contact support to assist you further.
🤗 Thank you very much for choosing Law Ruler!
Aside from Law Ruler, all other trademarks, trade names, screenshots, or company names referenced herein are used for identification purposes only and are the property of their respective owners.